
The ZEISS SURFCOM 130—a legacy surface finish tester that was once a staple in precision metrology. Although it has since been replaced by the SURFCOM Flex 50 and later by the SURFCOM Touch 50, many SURFCOM 130 units are still in active use today.
Therefore, this guide provides a walkthrough of its key components, calibration steps, and measurement setup for those continuing to rely on this dependable system.
LEARN MORE ABOUT THE ZEISS SURFCOM SERIES HERE
What Is the ZEISS SURFCOM 130?
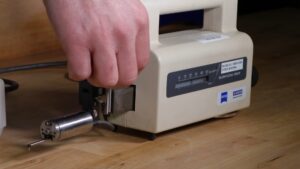
The ZEISS SURFCOM 130 replaced the ZEISS SURFCOM 120 in the late 1990s and includes four key components still common in newer models:
- Display Unit – Touchscreen (color or monochrome) with built-in printer.
- Drive Unit – Offers 50mm of measurement travel.
- Detector (LVDT) – Includes removable skids, commonly referred to as nose pieces.
- Stylus (Stylli) – Available in standard or extended lengths, including specialized options for deep or narrow grooves.
As a legacy system, replacement parts for the SURFCOM 130’s display may no longer be available. However, detectors and styli are still supported and repairable.
CONTACT US IF YOUR ZEISS SURFCOM UNIT IS MALFUNCTIONING
Calibration Process
To ensure accurate measurements, the stylus must be calibrated using a roughness standard.
Here’s a brief step-by-step to calibrating the ZEISS Surfcom:
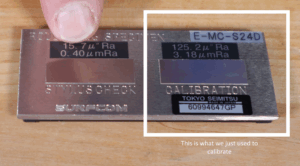
- Tap Calibrate, then choose Roughness Standard.
- Match the stylus length (standard or 2X).
- Input your artifact’s reference value (e.g., 125.2 µin).
- Position the stylus over the calibration patch and lower it until the bar is centered.
- Press Measure and confirm calibration when complete.
Afterward, a stylus check should follow using a low-range reference to detect any diamond chipping that may not appear at higher ranges.
WATCH VIDEO TO SEE THIS IN ACTION
Using the System Menu
The ZEISS SURFCOM 130 offers several user-configurable settings:

-
System Condition – Choose output units, stylus type, and measuring conditions.
- Measuring Parameters – Select roughness, waviness, or profile measurements.
- Cutoffs & Evaluation Length – Define how much of the surface to analyze and which standard to apply (ISO, JIS, ASME, DIN).
- Curve Measurement – For curved surfaces, use a stylus without a skid and set the system to “R curve.”
- Output & Printing – Customize parameter outputs (e.g., Ra, Rz, Rt) and print the measurement report including plots, conditions, and metadata.
Summary
Although discontinued, the ZEISS SURFCOM 130 still holds value in many metrology labs. Understanding how to calibrate, operate, and maintain it is essential for accurate surface finish measurements. Whether you’re looking to extend the life of your ZEISS SURFCOM 130 or transition to a newer model, proper usage remains key.
Looking to Upgrade from the ZEISS SURFCOM 130?
You can shop the latest ZEISS SURFCOM models. Explore upgraded features, improved software, and long-term support for your surface finish testing needs.
Need replacement parts or service?